Background
Fetching and displaying data is routine for front-end developers, but as more states arise, it can make the entire project extremely chaotic. This article aims to highlight existing issues and propose viable solutions, documenting the process of finding more efficient methods.
Although the article uses the Vue Composition API, the focus is not on the framework used but the underlying concepts. The context in React is similar; if you want to approach it from a React perspective, I recommend this article: 为什么你不应该在 React 中直接使用 useEffect 从 API 获取数据
Lv.1: Start with Sending a Simple Request
Currently, there is a simple product API that requires fetching data and displaying it on the screen. Here, we use the native JS fetch API + Async / Await to handle asynchronous requests and drive the UI through state.
<script setup>import { ref } from 'vue';
const product = ref({});
async function getProduct() {  const productResponse = await fetch('https://dummyjson.com/products/1');  if (!productResponse.ok) {    console.error(productResponse);    return;  }  const productJSON = await productResponse.json();  product.value = productJSON;}
getProduct();</script>
<template> <div> <img :src="product.thumbnail" /> <h2>{{ product.title }}</h2> <p>{{ product.description }}</p> </div></template>1️⃣ Review
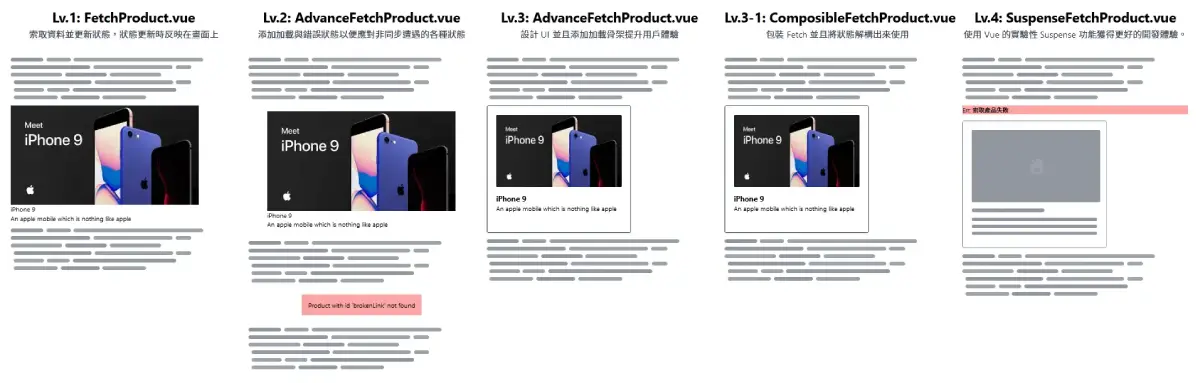
The requirement has been met, but you realize that this approach does not display errors or loading states, leaving users unaware of any progress! Therefore, in the next version, we will try to add more states to address this issue.
Lv.2: Adding Loading and Error States
In this version, more states such as isLoading and errorMessage are used to track request states, and these states drive the UI to give users more prompts.
<script setup>import { ref } from 'vue';
const { productUrl } = defineProps({  productUrl: {    type: String,    default: 'https://dummyjson.com/products/1',  },});
const product = ref({});const isLoading = ref(true);const errorMessage = ref('');
getProduct(productUrl);
async function getProduct(productUrl) {  isLoading.value = true;  const productResponse = await fetch(productUrl);  if (!productResponse.ok) {    console.error(productResponse);    errorMessage.value = (await productResponse.json()).message;    return;  }  const productJSON = await productResponse.json();  product.value = productJSON;  isLoading.value = false;}</script>
<template> <div id="app"> <div class="mx-auto max-w-fit bg-white p-4 text-black"> <div class="bg-red-300 p-4" v-if="errorMessage">{{ errorMessage }}</div> <div v-else-if="!isLoading"> <img :src="product.thumbnail" /> <h2>{{ product.title }}</h2> <p>{{ product.description }}</p> </div> <div v-else>Loading...</div> </div> </div></template>2️⃣ Review
At this stage, the user experience is nearly complete, but the developer experience is lacking. As scope expands or requirements change, components will become cluttered with various states. Simply understanding these states and avoiding wrong switches can be exhausting and error-prone. Moreover, layout shifts caused by loading can affect user experience and lead to performance issues due to recalculating page layouts, so in the next version, we will try to create a UI and resolve this issue.
Lv.3: Adding UI and Loading Skeleton
In this version, besides adding basic styles to the data, skeleton UI is also introduced. This is essentially a more visually appealing loader closer to the actual result, and it helps solve the previous layout shift issue.
<template> <div v-if="errorMessage">{{ errorMessage }}</div> <div v-else-if="!isLoading"> <ProductCard :product="product" /> </div> <div v-else> <SkeletonCard /> </div></template>3️⃣ Review
At this step, user experience is excellent, but in terms of state management, several solutions can be considered to enhance developer experience.
Lv.3-1: Wrapping Logic with Composable
Reflecting on the process of handling these states, it becomes clear that these states exist to manage data requests. Therefore, by wrapping related logic to handle these states, components can focus solely on the data itself. For example, creating a useFetch function that takes a request URL and outputs data, error messages, request states, etc., so there is no need to manage states for each request.
<script setup>const { data, error } = useFetch('https://dummyjson.com/products/1');</script>
<template>  <div v-if="error">{{ error.message }}</div>  <div v-else-if="product">    <ProductCard :product="product" />  </div>  <div v-else>    <SkeletonCard />  </div></template>
For details, refer to the official example, VueUse Implementation, or Nuxt Implementation. On top of this, more advanced features can be expanded, such as caching, retries, rendering mode switching, etc.
Lv.3-2: Using the Experimental <Suspense> Component
<Suspense> is essentially “a default Vue component for handling asynchronously loaded components,” which can display default content before the asynchronous component finishes loading. <Suspense> accepts two slots named default and fallback, with obvious purposes: default is for the asynchronous component, and fallback is for the default component (loading messages, etc.).
<template> <!-- The default component doesn't need to be imported; it can be used directly in the Template --> <Suspense> <template #default> <!-- Place the asynchronous component here --> <AsyncProductCard /> </template> <template #fallback> <SkeletonCard /> </template> </Suspense></template>The so-called asynchronous component can be of two types: 1. async setup() or top level await.
<!-- async setup() --><script>export default {  async setup() {},};</script>
<!-- top level await --><script setup>await xxx();</script>
Thus, we can directly create an asynchronous component AsyncProductCard (as shown below) and use the parent <Suspense> to help automatically display the default content until the component finishes loading.
<script setup>import ProductCard from '../ProductCard.vue';
import { ref } from 'vue';
const product = ref({});
async function getProduct() {  const productResponse = await fetch('https://dummyjson.com/products/1');  if (!productResponse.ok) {    console.error(productResponse);    // Throw an error on request failure to let the parent component handle it    throw Error('Fetching product failed');  }  const productJSON = await productResponse.json();  product.value = productJSON;}await getProduct();</script>
<template>  <ProductCard :product="product" /></template>
For error handling, we can utilize Vue3’s onErrorCaptured lifecycle, which can capture errors from child components and handle them in the parent component, thus allowing request errors to be communicated back to the user.
<script setup>import { ref } from 'vue';
const error = ref(null);onErrorCaptured((err) => {  error.value = err.message;});</script>
<template>  <div v-if="error" class="bg-red-300">Err: {{ error }}</div></template>
Summary
This article progressively demonstrates how to implement enhancements for user and developer experiences in data fetching in Vue, documenting the process in the Vue-Fetch-Demo repository, which you are welcome to freely access for practice.