前言
從很早以前就大致知道瀏覽器開始推出 Web Components 相關 API 與標準,但一直沒有機會在實戰中使用這項技術。
會想撰寫這篇文章記錄是因為隨著時間推移發現 Web Components 的應用範疇越來越廣,並且也可以看到各大框架套件相繼支援原生 Web Components,像是:Swiper也建議轉向 Web Components 實作的版本、Vue and Web Components、React Custom HTML elements 也有提到如何與 Web Components 配合。
因此趁著有空也來了解一下相關知識,並且分析它與現有的解決方案有什麼不同。
什麼是 Web Components
Web Components 是一系列瀏覽器 API 標準讓開發者可以在客戶端環境創建自定義、可客製化、獨立的 HTML 元件。可以在任何現代瀏覽器環境中使用,不需要額外的框架或工具。
相信非常多前端都有接觸過 Vue、React、Angular 這類框架套件,也熟悉它們提供的元件概念,但具體來說 Web Components 與這些框架身為瀏覽器原生功能之外有什麼不同呢?
- 原生便利:Web Components 是存在於瀏覽器的原生 API,因此無須建置任何環境即可使用。
- 侷限性:Web Components 被設計應用於客戶端環境,無法像現代框架套件一樣提供伺服器端渲染(SSR)的功能,像 Next、Nuxt。
- 社群支援度:論當前社群支援度,現代前端框架套件們的支援度遠遠高於 Web Component,大多數已於早期已經發展一套完善的解決方案,立即替換 Web Components 並不是一件容易的事情。但可以確定的是這項標準的推出將會凝聚前端關於元件 UI 的實作方式。
建立 Web Components
先讓我們創建一個自定義的 hello-world 元素再依序說明:
class HelloWorld extends HTMLElement {  constructor() {    super(); // 調用父類(HTMLElement Class)的 constructor    this.innerHTML = '<h1>Hello World</h1>';  }}
window.customElements.define('hello-world', HelloWorld);
可以發現整個客製化元素的建立過程非常的簡單,首先是建立一個繼承自 HTMLElement 的 Class,然後在 constructor 中設定元素的內容,最後使用 window.customElements.define 方法註冊元素,便可以在 HTML 當中自由的加入新定義好的元素。
<hello-world></hello-world>可以為元素加入任何你想要的屬性、方法、事件並且重複置入在頁面任何角落,就像任何 HTML 元素一樣!唯一需要留意的是元素命名有一定的原則需要遵守:Valid custom element names。
生命週期
Web Components 具備對應的生命週期:
constructor():初始化元素實例。connectedCallback():當元素被插入到 DOM 中時調用。disconnectedCallback():當元素從 DOM 中移除時調用。attributeChangedCallback():當元素的屬性被增加、移除、更新時調用。
可以根據需求在客製化元素中根據生命週期進行操作,例如:當元素被添加到 DOM 中時綁定事件監聽,並在移除時解除。
Shadow DOM
單純的操縱頁面 DOM 是長久以來前端們熟悉的方式,但擴展性卻不太好,原因是因為我們無法確保自定義元素的樣式與行為不會受外部影響,這時候 Shadow DOM 就能派上用場。
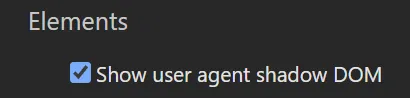
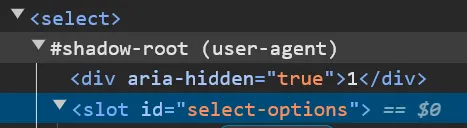
舉例 HTML 原生的 <Select> 元素,會發現不同瀏覽器都為其預設製作了一些 DOM 獨立於整體網頁,背後是因為使用了 Shadow DOM,可以打開顯示 user agent shadow DOM 設定來觀察各瀏覽器背後是如何實作各項元素。
你會希望自定義元素也能像 <Select> 一樣具有完全獨立的樣式與行為,這時候 Shadow DOM 就能派上用場。
第一步:創建 Shadow DOM Root
根據先前的 HelloWorld 範例,我們可以在 constructor 中創建 Shadow DOM Root 透過 attachShadow 方法,設置 mode 決定我們在創建後是否可以透過 this.shadowRoot 來修改 Shadow DOM。
class HelloWorld extends HTMLElement { constructor() { super(); const shadowRoot = this.attachShadow({ mode: 'open' }); // open & closed 允許創建的 ShadowDom 是否允許修改 }}第二步:創建 Template
創建 Shadow DOM Root 後可以製作對應的 template 元素與樣式:
const template = document.createElement('template');template.innerHTML = `<style> h3 {color: green}</style><h3 data-title></h3>`;第三步:將 Template 插入 Shadow DOM
透過 cloneNode + deep 參數 可以將所有的 template 內容插入 Shadow DOM 中。也可以針對 shadowRoot 進行元素的搜尋與修改,舉例先前製作的 template 就預埋了一個 data-title 的屬性,透過搜尋該項屬性所在的元素可以輕易的更改其內容透過 JS:
shadowRoot.appendChild(template.content.cloneNode(true));shadowRoot.querySelector('[data-title]').innerText = 'foobar';Slot
<slot> 是 Web Components 內建的 HTML 元素,一個佔位符用於代表輸入客製化元素的內容,舉例來說以下注入 hello-world 客製化元素的內容應該如何處理?
<hello-world> <span>Foobar</span></hello-world>可以透過 slot 來為其安排:
const template = document.createElement('template');template.innerHTML = `<style> h3 {color: green}</style><h3 data-title> <slot></slot></h3>`;具名 Slot
可以透過 name 屬性來區分多個 slot:
const template = document.createElement('template');template.innerHTML = `<h3><slot name="title" /></h3><p><slot name="content" /></p>`;並且在 HTML 中透過 slot 屬性來指定對應的 slot 名稱:
<hello-world> <span slot="title">Title</span> <span slot="content">Content</span></hello-world>實作計數器
讓我們透過 Web Components 實作一個簡單的計數器元件:
class Counter extends HTMLElement {  constructor() {    super();    this.count = 0;    this.attachShadow({ mode: 'open' });  }
  connectedCallback() {    this.render();    this.shadowRoot.querySelector('[data-increment]').addEventListener('click', () => this.increment());    this.shadowRoot.querySelector('[data-decrement]').addEventListener('click', () => this.decrement());  }
  increment() {    this.count++;    this.updateCount();  }
  decrement() {    this.count--;    this.updateCount();  }
  updateCount() {    this.shadowRoot.querySelector('[data-count]').textContent = `Count: ${this.count}`;  }
  render() {    this.shadowRoot.innerHTML = `      <style>        :host {          display: block;          text-align: center;        }        button {          font-size: 1rem;          padding: 0.5em 1em;          margin-top: 1em;        }      </style>      <div data-count>Count: ${this.count}</div>      <button data-increment>Increment</button>      <button data-decrement>Decrement</button>    `;  }}
customElements.define('app-counter', Counter);
總結
以上簡單的實際操作創建 Web Components 後發現相較於其他成熟的 JS 框架套件,它更像是一個底層客製化 DOM 元素的 API 標準,相較於當前複雜的前端需求:
- 宣告式且簡潔高效的模板系統
- 響應式的狀態與對應的跨組件通訊
- 伺服端渲染
Web Components 一樣都沒有 😅,並不會取代現有的解決方案,不過可以期待更多網頁元件的實作方式會向瀏覽器原生 API 靠攏。此外完全基於 Web Components 的輕量套件像是 Lit 也可以留意看看。
延伸閱讀
- The Story of Web Components - uidotdev
- Web Components Crash Course - Traversy Meid
- Vue and Web Components - Vue.js
- What Are Web Components? - Syntax
- Web components - JavaScript.INFO